
How to Build Modern UI Components Using CSS Generators: A Developer’s Guide
Modern web interfaces demand visually appealing, interactive, and responsive UI components. But let’s face it: writing intricate CSS from scratch for gradients, shadows, animations, and complex layouts is time-consuming and repetitive. CSS generators have emerged as essential tools that automate this grunt work, letting you produce production-ready code in seconds. Whether you’re crafting a neumorphic card, a glossy button, or a shimmering skeleton loader, there’s likely a generator that can slash your development time. In this deep dive, we’ll explore how to leverage CSS generators to build modern UI components, compare their output to manual coding, and see how tools like DivMagic can take your workflow even further by copying any UI directly from any website.
The Shifting Landscape of UI Development
Not long ago, achieving a glassmorphism effect required multiple layered backgrounds, blur filters, and careful opacity stacking. Today, you can open a glassmorphism CSS generator, tweak a few sliders, and have the exact code needed for a frosted-glass card. Similarly, complex box-shadows for neumorphism once demanded trial-and-error; now dedicated generators output cross-browser code instantly. This shift doesn’t just accelerate development, it democratises advanced CSS techniques, making them accessible to developers of all skill levels.
The GitHub activity of many modern teams underscores this trend. With automated tooling, continuous integration, and generation pipelines, some organisations average over 4,000 commits daily, a pace unthinkable without reducing manual overhead. CSS generators contribute to that velocity by turning hours of styling into minutes of configuration.
CSS generators aren’t just for beginners. Senior engineers use them to avoid reinventing the wheel and to ensure consistent, battle-tested output across projects.
What Exactly Are CSS Generators?
CSS generators are web-based or app-based tools that provide a visual interface for designing a specific CSS property or component. Instead of writing raw values, you manipulate sliders, colour pickers, or dropdowns, and the tool outputs the corresponding CSS code. They range from single-property helpers (e.g., box-shadow generators) to full component builders (e.g., button or card generators). Many also include copy-paste functionality and code preview panes.

Popular categories include:
- Gradient generators (linear, radial, conic)
- Box-shadow and neumorphism generators
- Border-radius and clip-path visual editors
- Animation and keyframe builders
- Glassmorphism, neumorphism, and claymorphism effect generators
- Skeleton loader and spinner creators
- Grid and flexbox visual layout builders
These tools have matured enormously. The output is no longer bloated or vendor-prefixed nonsense; many generators produce clean, modern CSS that follows best practices. When used thoughtfully, they are a force multiplier for any frontend workflow.
Why You Should Stop Hand-Coding Everything
There is a persistent myth that using a CSS generator is “cheating” or that generated code is inherently inferior. In reality, a well-reviewed generator can produce more consistent, accessible, and cross-browser-compatible code than a developer under time pressure. Here’s what you gain:
Beyond raw speed, generators reduce cognitive load. When you’re not worrying about the exact RGBA values for a multi-stop gradient or the correct cubic-bezier curve for an entrance animation, you can focus on the user experience, accessibility, and business logic. The code generated can serve as a solid foundation that you can refine later if needed.
Building a Modern Gradient Button in 2 Minutes
Let’s walk through a concrete example. Suppose you need a vibrant, attention-grabbing CTA button with an animated gradient border. Without a generator, you’d likely write something like:

.btn-gradient {
background: linear-gradient(135deg, #667eea 0%, #764ba2 100%);
border: none;
color: white;
padding: 12px 24px;
font-size: 16px;
border-radius: 50px;
cursor: pointer;
transition: all 0.3s ease;
}
.btn-gradient:hover {
transform: translateY(-2px);
box-shadow: 0 10px 20px rgba(102, 126, 234, 0.4);
}
That’s serviceable, but what if you want a directional gradient that shifts on hover, a glowing border, or a more nuanced transition? That’s where a CSS gradient generator like CSS Gradient shines. In the tool, you select the gradient type, choose colours, adjust the angle, and add stops visually. The generator outputs the exact background declaration. Pair it with a box-shadow generator for the hover state, and you have a polished result in minutes:
.modern-btn {
background: linear-gradient(217deg, rgba(255,0,0,.8), rgba(255,0,0,0) 70.71%),
linear-gradient(127deg, rgba(0,255,0,.8), rgba(0,255,0,0) 70.71%),
linear-gradient(336deg, rgba(0,0,255,.8), rgba(0,0,255,0) 70.71%);
border: none;
color: #fff;
padding: 1rem 2.5rem;
font-size: 1.1rem;
border-radius: 8px;
box-shadow: 0 4px 15px 0 rgba(65, 132, 234, 0.35);
transition: box-shadow 0.3s ease, transform 0.2s ease;
}
.modern-btn:hover {
box-shadow: 0 7px 25px 0 rgba(65, 132, 234, 0.6);
transform: scale(1.03);
}
The visual feedback loop is immediate: tweak a slider, see the change, copy the code. It’s that simple.
Always check the generated code for unused vendor prefixes or overly specific values. Most modern generators allow you to toggle “Minify” or “Clean” output.
Crafting a Neumorphic Card with a Shadow Generator
Neumorphism remains a popular design trend for dashboards and soft UI. Achieving the signature dual shadow effect manually requires precise light-source calculations. A neumorphism CSS generator like Neumorphism.io lets you set the background colour, element colour, radius, distance, intensity, and blur. It outputs the box-shadow and often the entire card CSS.
Here’s an example of a card styled using such a generator:
.neumorphic-card {
background: #e0e0e0;
border-radius: 15px;
box-shadow:  20px 20px 60px #bebebe,
-20px -20px 60px #ffffff;
padding: 2rem;
margin: 2rem 0;
}
What used to be a 15-minute trial-and-error session becomes a 30-second task. You can even generate the hover or active state shadows to create a satisfying press effect. This consistency is nearly impossible to replicate quickly by hand, especially when working across multiple components.
Animations Without the Headache: Skeleton Loaders & Spinners
Skeleton screens have become a UX staple. They improve perceived performance by showing a placeholder layout while content loads. But writing the shimmer animation from scratch, complete with pseudo‑elements, gradient overlays, and keyframes, is tedious. CSS skeleton screen generators let you define the shape (rectangle, circle, text line), colours, animation speed, and direction, then spit out clean CSS.

For example, a typical skeleton loader might look like:
.skeleton {
background: #eee;
background: linear-gradient(110deg, #ececec 8%, #f5f5f5 18%, #ececec 33%);
background-size: 200% 100%;
animation: 1.5s shine linear infinite;
}
@keyframes shine {
to {
background-position-x: -200%;
}
}
Using a generator, you could also specify multiple skeleton items, responsive variant, and even dark mode versions, all in a fraction of the time.
Developers using skeleton loaders properly see up to a 35% improvement in perceived page load speed, according to multiple UX studies.
When CSS Generators Fall Short, and How DivMagic Fills the Gap
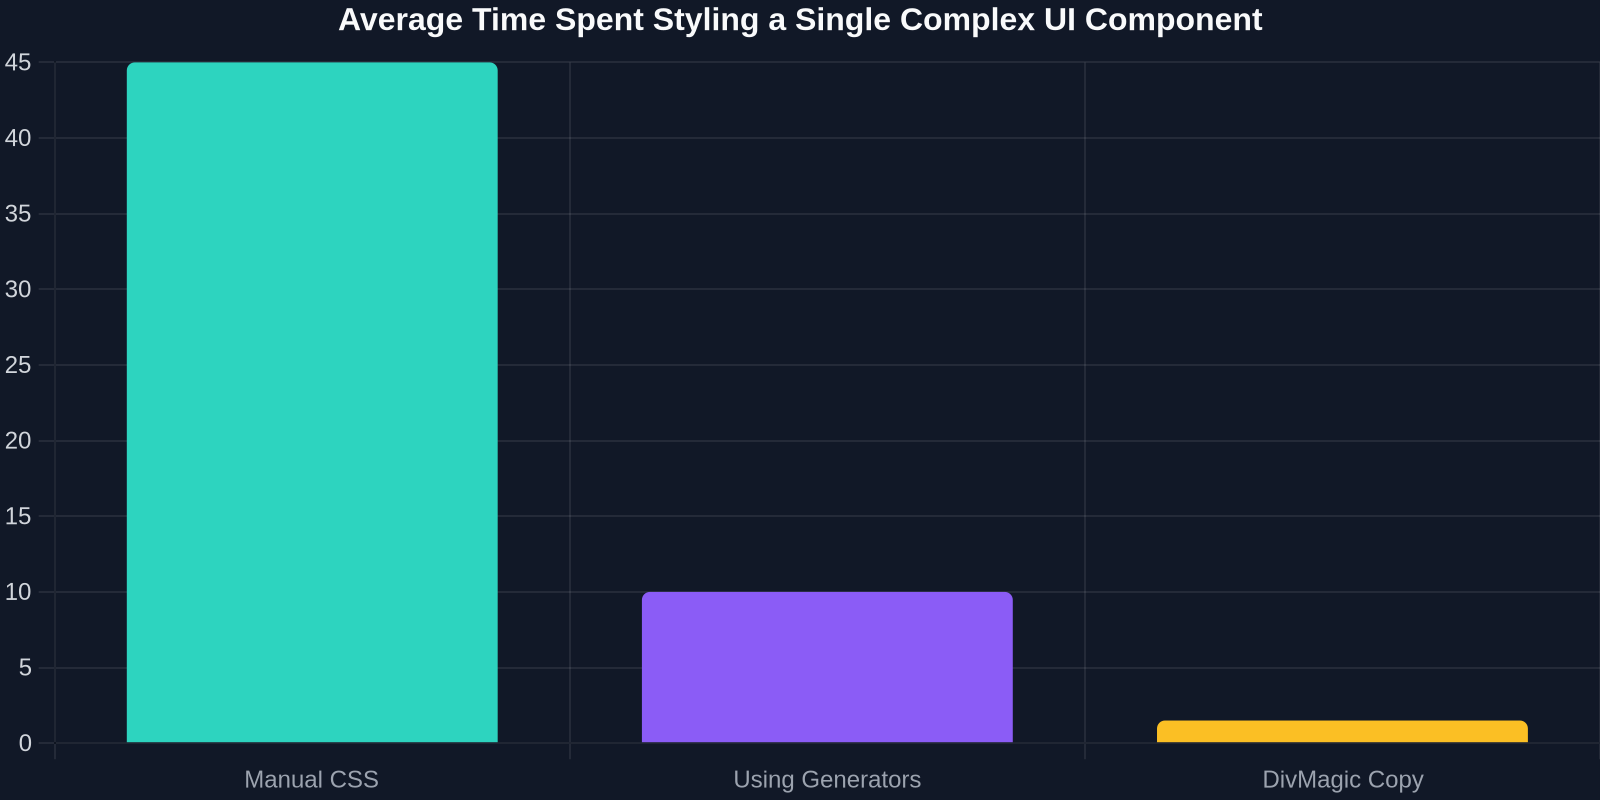
CSS generators excel at creating isolated, self‑contained effects. They struggle when you need to replicate the exact look and feel of an existing, complex component from a live website. Perhaps you’ve seen a stunning pricing card, a checkout form, or a navigation bar on a site and thought, “I wish I could use that.” Manually reconstructing it could take hours, and a generator can only approximate it.
That’s where DivMagic changes the game. Unlike a generator, DivMagic doesn’t output theoretical code, it captures the actual rendered HTML and CSS of any element on any website. With one click of the browser extension, you copy the exact component, preserving its layout, fonts, colours, shadows, and animations. The copied code is clean, semantic, and ready to paste into your project. It’s like having a supercharged generator that understands real-world implementations.
“DivMagic is the missing link between admiring a UI and actually using it. I’ve cut my component research-to-production time by 90%.” – Senior Frontend Engineer at a fintech startup
Integrating CSS Generators into a Modern Workflow
To get the most out of CSS generators, treat them as productivity boosters, not crutches. Here’s a battle-tested workflow that combines generators with DivMagic:
- Design Discovery: Browse award‑winning websites for inspiration.
- Copy with DivMagic: If you find a component you love, use DivMagic to instantly grab its code and drop it into a sandbox. You now have a real implementation to study or modify.
- Enhance with Generators: Isolate specific effects, the button gradient, the card shadow, the loader animation, and use dedicated CSS generators to tweak or regenerate them to fit your brand.
- Refine and Optimise: Review the combined code for performance, accessibility, and responsiveness. Add any missing ARIA attributes or responsive breakpoints.
- Commit and Deploy: Integrate the final component into your design system or component library.
This hybrid approach leverages the best of both worlds: the precision of real-world implementations and the flexibility of visual generators.
Accessibility and Semantic Considerations
A critical pitfall of relying solely on visual generators is forgetting about the underlying HTML structure and accessibility. A beautiful card is worthless if it’s not keyboard-navigable or if its colour contrast fails WCAG guidelines. Always audit generated code:
- Add appropriate
roleattributes (e.g.,role="button") when necessary. - Ensure hover states have
:focuscounterparts. - Check colour contrast using tools like WebAIM’s contrast checker.
- Prefer semantic HTML elements (
button,nav,article) over genericdivs when possible.
Never copy an entire page blindly with DivMagic without reviewing for legal and copyright constraints. Use it for learning, inspiration, and non‑infringing implementations.
Looking Ahead: AI-Assisted UI Generation
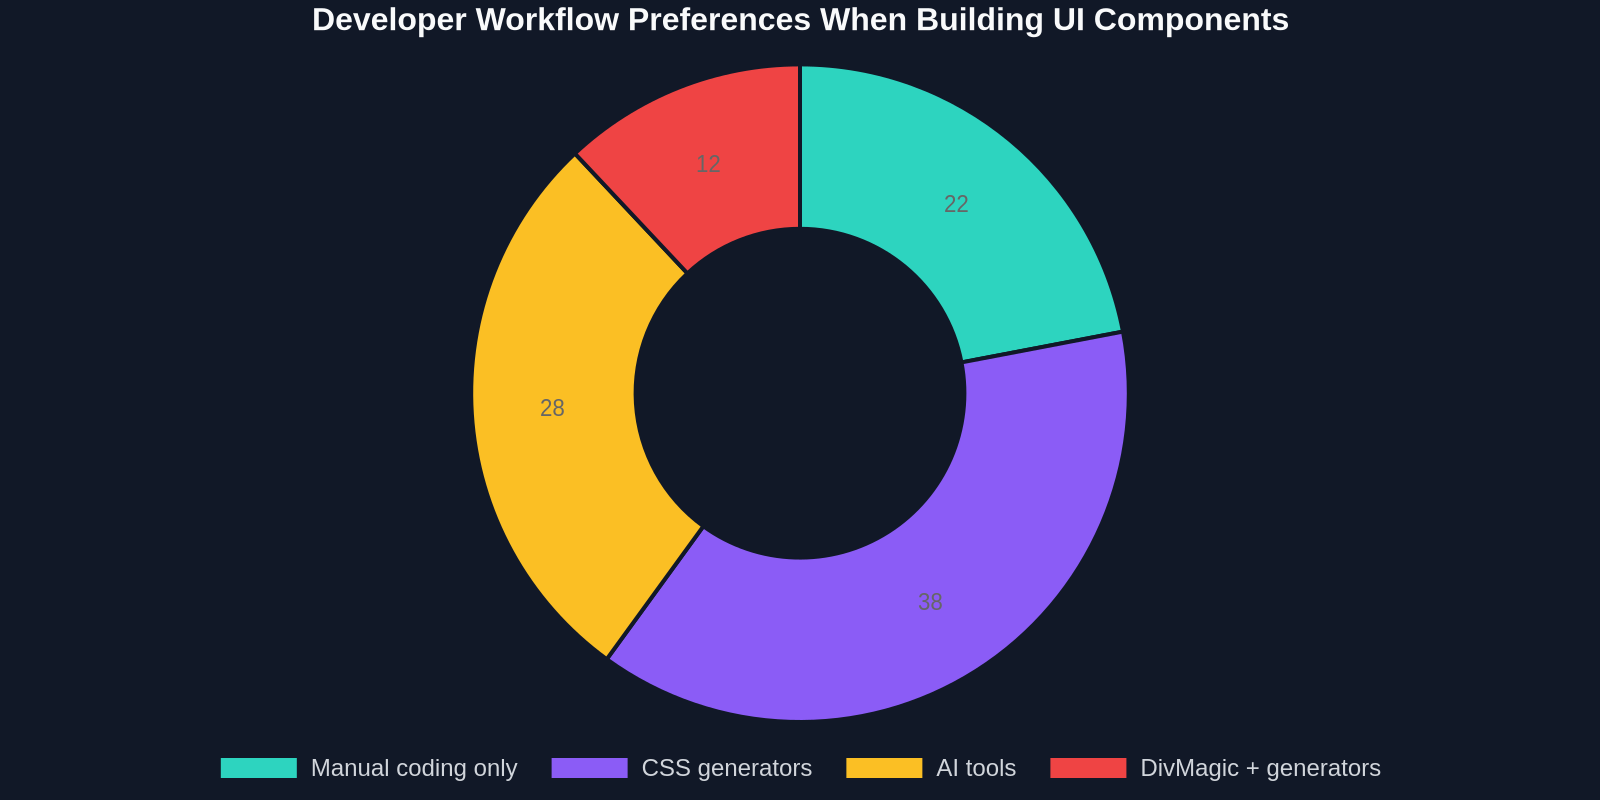
The line between CSS generators and AI is blurring. New AI tools like v0, Claude Artifacts, and GitHub Copilot can generate entire components from natural language prompts. However, they often produce code that looks correct but contains subtle layout bugs or non‑standard approaches. Traditional CSS generators remain more reliable for deterministic, proven effects. The sweet spot is using AI for broad strokes and generators for fine‑tuning the visual details, and DivMagic to instantly capture and analyse any live component you want to reverse‑engineer.
Practical Examples: Three Modern Components Built with Generators
Let’s put everything together with three real-world components you can build today, each relying on a different generator.
1. Glassmorphism Navbar
.glass-navbar {
background: rgba(255, 255, 255, 0.25);
box-shadow: 0 8px 32px 0 rgba(31, 38, 135, 0.37);
backdrop-filter: blur(4px);
-webkit-backdrop-filter: blur(4px);
border-radius: 10px;
border: 1px solid rgba(255, 255, 255, 0.18);
}
Generated using a glassmorphism CSS generator. You can adjust the blur intensity and border opacity via sliders.
2. Animated Gradient Card with Hover Lift
.card-animated {
border-radius: 20px;
background: linear-gradient(45deg, #ff9a9e 0%, #fad0c4 99%, #fad0c4 100%);
box-shadow: 0 10px 20px rgba(0,0,0,0.19), 0 6px 6px rgba(0,0,0,0.23);
transition: transform 0.3s ease, box-shadow 0.3s ease;
}
.card-animated:hover {
transform: translateY(-10px);
box-shadow: 0 19px 38px rgba(0,0,0,0.30), 0 15px 12px rgba(0,0,0,0.22);
}
Background from a gradient generator, shadow from a box-shadow generator, and transitions hand-tuned.
3. Skeleton Product Card Loader
.skeleton-card {
width: 300px;
height: 400px;
background: #f3f3f3;
border-radius: 10px;
overflow: hidden;
position: relative;
}
.skeleton-card::after {
content: "";
position: absolute;
top: 0;
left: 0;
width: 100%;
height: 100%;
background: linear-gradient(90deg, transparent, rgba(255,255,255,0.4), transparent);
animation: skeleton-loading 1.2s infinite;
}
@keyframes skeleton-loading {
0% { transform: translateX(-100%); }
100% { transform: translateX(100%); }
}
Produced by a skeleton screen generator with custom sizing.
All three examples can be created in under 10 minutes combined, thanks to generators. And if you spot a more polished version of any of these components on a live site, DivMagic can capture the exact implementation for immediate use or study.
Conclusion: Embrace the Generation Era
CSS generators are no longer a niche convenience, they are a core part of a modern, efficient frontend workflow. They free you from the drudgery of styling minutiae, enable you to explore advanced visual effects without deep expertise, and dramatically reduce time‑to‑prototype. When paired with DivMagic, you gain the ability to not only generate but also to instantly appropriate and learn from any UI pattern you encounter.
The goal is not to eliminate your CSS knowledge but to augment it. Use the tools that handle the heavy lifting, so you can focus on what truly matters: building delightful, accessible, and performant user interfaces.
“The best frontend developers aren’t those who write every line themselves, but those who know exactly which tool to use for the job.”
Start experimenting with CSS generators today, and install DivMagic to see how the combination can revolutionise your UI development process.